News The rules of press brake tool selection
By Paul LeTangProduct Manager of Press Brakes/ToolingBystronic Inc.
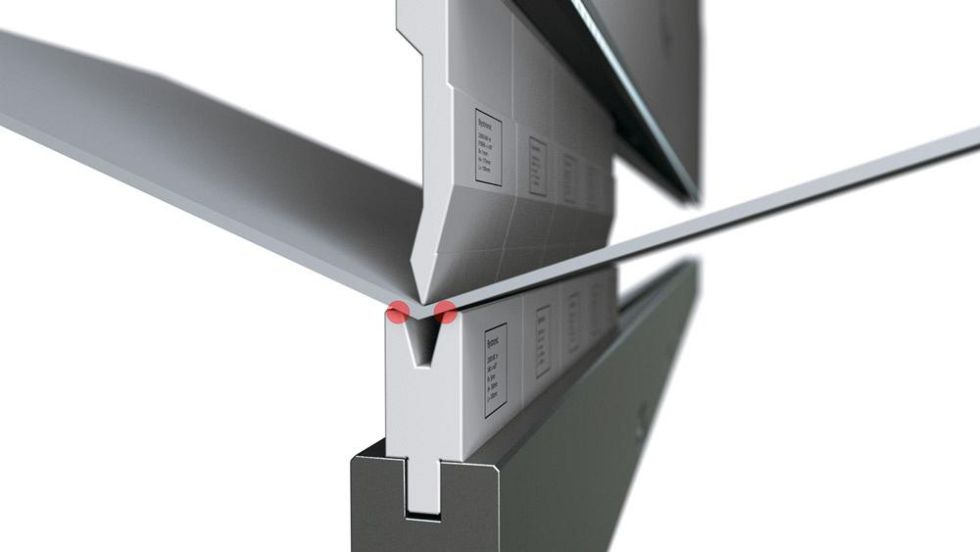
Many consider press brake tooling a minor accessory in metal forming when in fact the opposite is true. Although press brakes have evolved into multiaxes, high-precision machines with self-stabilizing features, the tooling is all that ever actually touches the part during bending (see Figure 1).
The line has blurred between RFA, New Standard, European, and American standard tooling. Many features needed for high-performance bending have migrated to all the various tooling types. Regardless of which tooling and clamping style you choose, be sure it meets at least a few minimum requirements.
High precision. The tools should be manufactured to tolerances within the 0.0004-inch range. This is critical to achieve part accuracy without shimming or other tweaks during setup.
Segmented sections. These allow you to build various lengths out of several precut pieces. Small pieces are safer and easier to handle too.
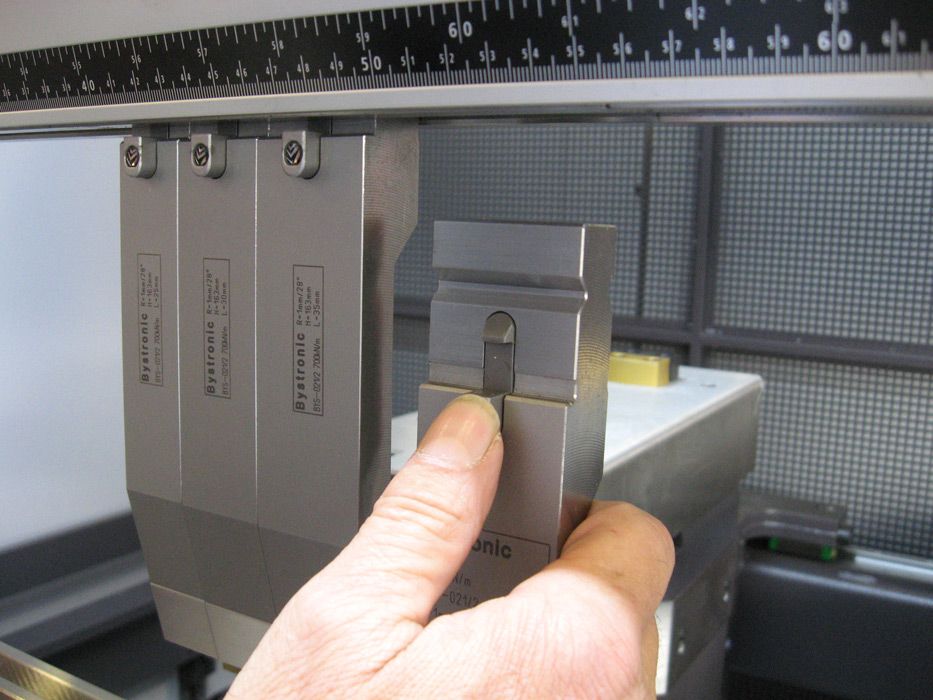
Self-retaining installation. You should be able to load the tools with the ram up. The toolholding system should hold multiple pieces in place until the clamping pressure is applied (see Figure 2).
Self-seating. As clamping pressure is applied, the punches are mechanically pulled up into position. This eliminates the need to bottom the punch into the die during the setup.
Front loading. You should be able to install tools from the front of the machine. This shortens setup time because you no longer need to spend time sliding tools from the end of the press brake. In most cases, front loading also eliminates the need for forklifts and overhead cranes.
Standard sizes. Common-height tools can reduce the need for machine adjustments when changing jobs. Front support arms, backgauge heights, and safety devices all remain at a common position. And because tools are made to the same heights, you can add off-the-shelf pieces and be sure they will match your existing tools.
Many high-quality press brake tools are made to metric standards. So a nominal sized 0.250-in. V opening is actually 6 mm, or 0.236 in. Moreover, bends in sheet metal have slightly elliptical corner radii, so you only have to get close to get correct. For simplicity, imperial dimensions are rounded in this article.
Note that the discussion that follows focuses on air bending, and for good reason. The trend is to abandon bottoming or coining and embrace air bending whenever possible. Be aware, however, that not all parts can be produced using classic air bending techniques.
Operators throughout the industry use very different tooling to make parts of similar or identical quality. Plenty of operators make acceptable parts with incorrect tooling because they don’t have access to the correct tooling. They make it work; but “making it work” isn’t efficient or repeatable, and it can seriously hinder work flow. Best practices in tooling selection really should have one elegantly simple goal: to achieve the best-quality parts in the least amount of time possible.
What Tools Do You Need and Why?
A maintenance shop will need and use different press brake tools than a custom fabricator will. So before diving into specifics, identify your needs and budgetary constraints.
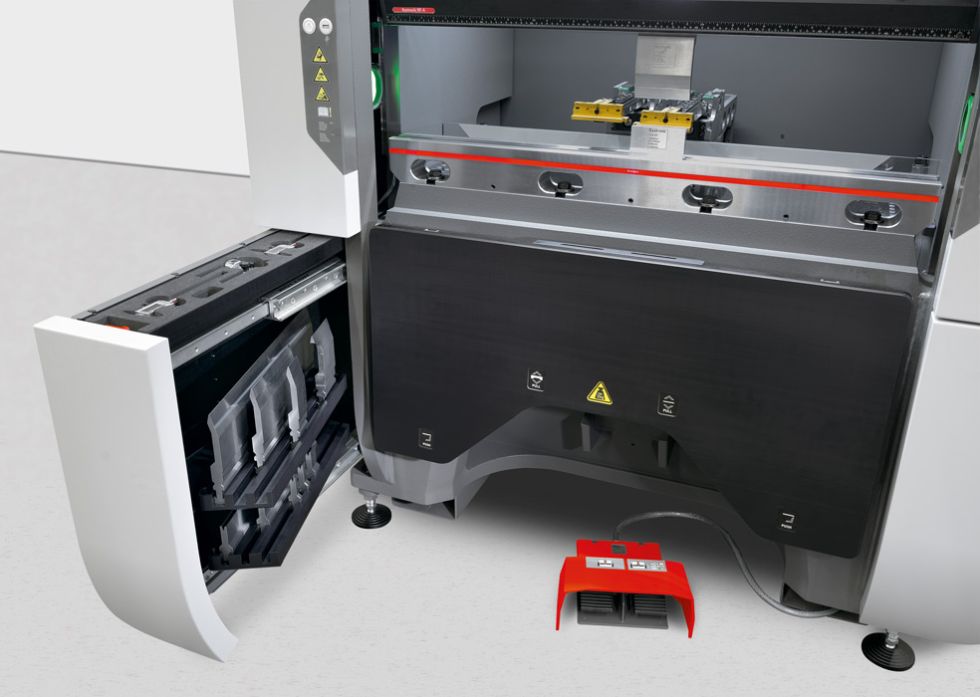
For instance, you might need additional tools to shorten setup times. You might follow lean manufacturing principles and recognize the benefits of having a separate tool library for each press brake—and hence, be willing to invest in duplicate sets of tools stored at machines. You don’t lose valuable setup time walking to and from the tool crib and elsewhere looking for the correct tools. An added benefit here is that tool style compatibility from machine to machine is no longer necessary, because the tools tend to stay with their intended machine (see Figure 3).
If you need to buy additional, duplicate tools to expand each brake’s dedicated tool crib, choosing them is relatively straightforward. You’ll often find these tools located in convenient places, if not already in the press brakes. Look for the tools with the most wear and tear—those with shiny, bright working surfaces. The body of the tools will likely be clean and bright too. Rusty, dirty tools on the bottom of the rack are not likely candidates.
Die Selection
To get the biggest bang for your buck, choose a minimum number of lower dies that will cover the entire range of metal thicknesses your shop forms. Shops with little tribal knowledge, unforeseen applications, and limited budgets should try selecting lower dies using the 8×2 rule.
First, determine the range of metal thicknesses you want to bend. For example, you might need to bend material 0.030 in. through 0.250 in thick.
Second, assess the smallest V die needed by multiplying the thinnest metal by 8. In this case, 0.030-in. material would need the smallest die, hence: 0.030 × 8 = 0.24, which we’ll round up to 0.25.
Third, assess the largest V die needed by multiplying the thickest metal by 8. In this case, the thickest material of 0.250 in. would need the largest die: 0.250 × 8 = 2.
You’ve now determined the smallest and largest die you need—0.25 and 2 in. To fill in what you need in between, you start with the smallest V die and double its size. In this case, that gives you a 0.5-in. die (0.25 × 2 = 0.5). Next, double the 0.5-in. die to get 1.0 in., then double that to get 2.0 in. This gives you a minimum of four different V-die openings to bend 0.030- to 0.250-in. material: 0.25, 0.5, 1.0, and 2.0 in.
Punch Selection
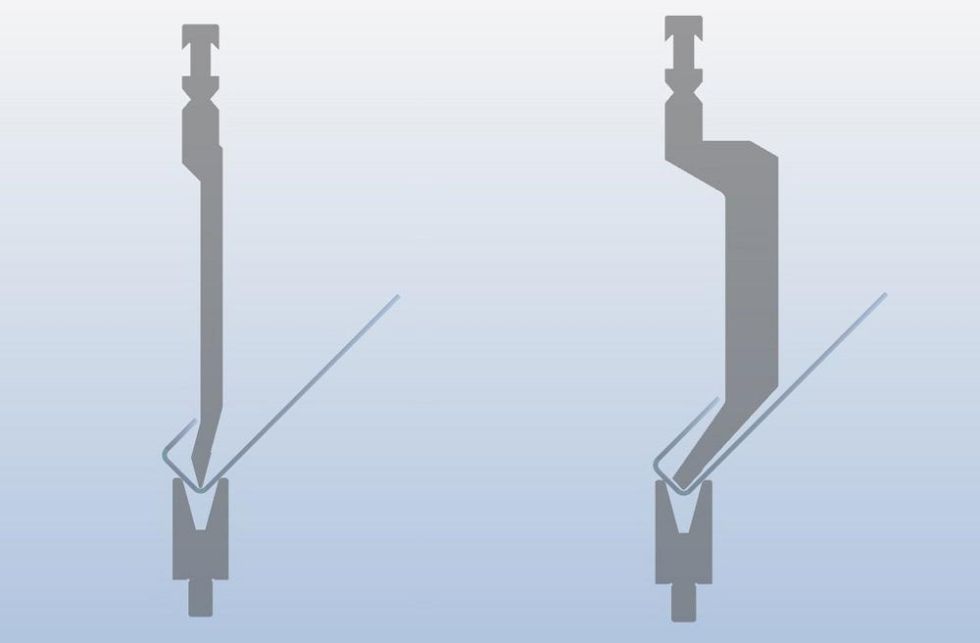
You also use material thickness to determine the minimum number of upper punches. For material 0.187 in. and thinner, you can use an acute offset knife punch with a 0.04-in. radius. The acute angle allows bending past 90 degrees, and the offset allows you to form J shapes. To handle the higher forces when forming material between 0.187 and 0.5 in. thick, consider a straight punch with about a 0.120-in. radius.
Note that for some applications, including those using thicker and high-tensile material, the workpiece tends to crease, crack, or even split in two when using common industry bending standards. It comes down to physics. A narrow punch tip exerts more force on the bend line; combine that with a narrow V-die opening, and the forces rise even more. For challenging applications, and especially when material thicknesses are above 0.5 in., it is best to consult your material supplier on the recommended punch tip radius.
The Rule of 8
In a perfect world, you should be able to select the V-die opening using what we call the rule of 8; that is, the V-die opening should be 8 times the material thickness. To determine this, multiply the material thickness by 8 and choose the closest available die. So if you have 0.060-in.-thick material, you need a die that’s 0.5 in. (0.060 × 8 = 0.48; 0.50 in. is the closest die width); for 0.125-in. material, you need a 1-in. die (0.125 × 8 = 1). This ratio gives the best angular performance, which is why many call it the “sweet spot” for V-die selection. Most published bending charts are centered around this formula.
Simple enough? Well, it would be in that perfect world, and you could live in that perfect world if the sheet metal designers always followed the rule of 8. But alas, in the real world, the exceptions abound.
V-die Opening Determines the Radius
When air bending mild steel, the inside bend radius forms at approximately 16 percent of the V-die opening. So if you air-bend material over a 1-in. V die, your inside bend radius will be about 0.16 in.
Say a print specifies 0.125-in. material. In a perfect world, you’d multiply that thickness by 8 and use a 1-in. V die. Simple enough. But many sheet metal designers like to specify a bend radius equal to the metal thickness. What if the print specifies an inside radius of 0.125 in.?
Again, material air-bends an inside radius that’s about 16 percent of the die opening. This means your 1-in. die can produce a radius of 0.160 in. Now what? Just use a narrower V die. A 0.75-in. die will give you an inside radius that will be close to 0.125 in. (0.75 × 0.16 = 0.12).
Similar thinking applies for prints that specify larger bend radii. Say you need to form 0.125-in.-thick mild steel to a 0.320-in. inside bend radius—more than double the material thickness. In this case, you’d choose a 2-in. die, which would produce an inside bend radius of about 0.320 in. (2 × 0.16).
There are limits to this. For instance, if you find that to achieve the specified inside bend radius you need a V-die opening that’s less than five times the metal thickness, you will compromise angular accuracy, possibly damage the machine and its tooling, and put yourself in a very unsafe situation.
Minimum Flange Length
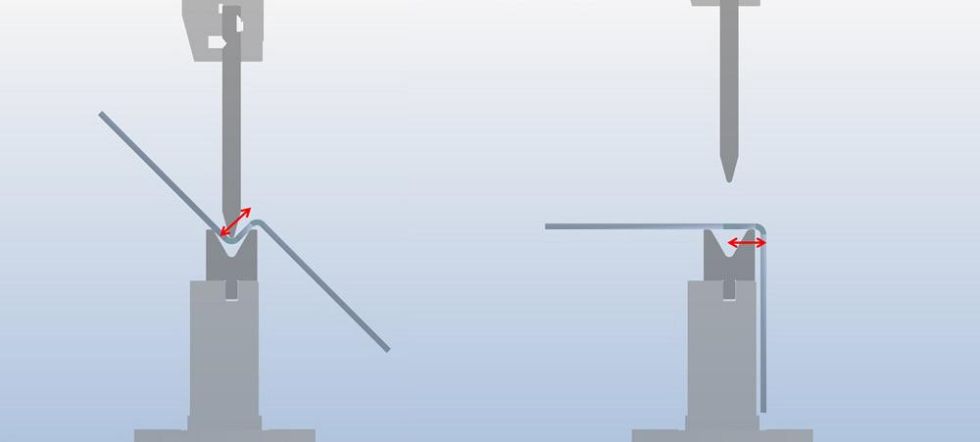
Keep flange lengths in mind when choosing your V dies. The minimum flange a given V die can form is approximately 77 percent of its opening. So a part being formed over a 1.-in. V die will need at least a 0.77-in. flange.
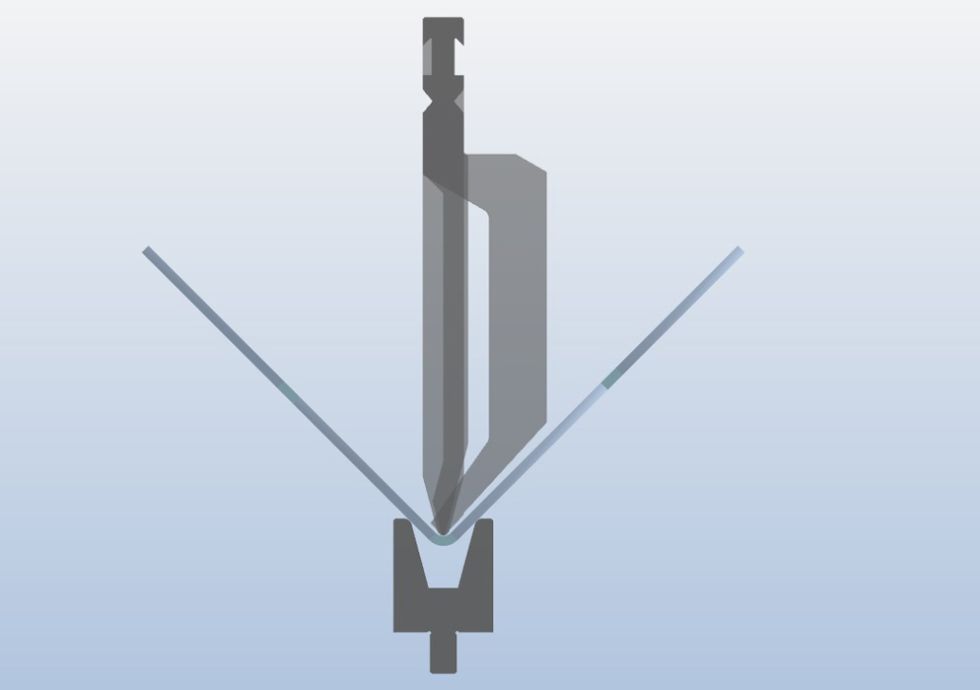
Many sheet metal designers like to save metal and specify a flange that’s too short, like a 0.5-in. flange in 0.125-in. material thickness (see Figure 4). According to the rule of 8, 0.125-in.-thick material calls for a 1-in. V die—but that 1-in. V die requires the workpiece to have a flange that’s at least 0.77 in. Now what? Again, you can use a narrower V die. For instance, a 0.625-in. die can form parts with flanges as short as 0.5 in. (0.625 × 0.77 = 0.48, rounding up to 0.5).
This also has limits. Just as with tight inside bend radii, if a flange requires a die width that’s less than five times the material thickness, you’ll experience angular accuracy issues, cause possible damage to the machine and its tooling, and put yourself in harm’s way.
Punch Selection Rules
For L shapes the rules are … there are no rules. Almost any punch shape will work. So when selecting punches for a group of parts, you always should consider these L-shaped parts last, considering just about any punch shape can handle them.
When forming these L shapes, use a punch that also can form other parts, rather than adding unnecessary tools to the library. Remember, when specifying tooling, less is always best—not just to minimize tooling cost, but also to reduce setup time by reducing the number of tool shapes needed on the shop floor (see Figure 5).
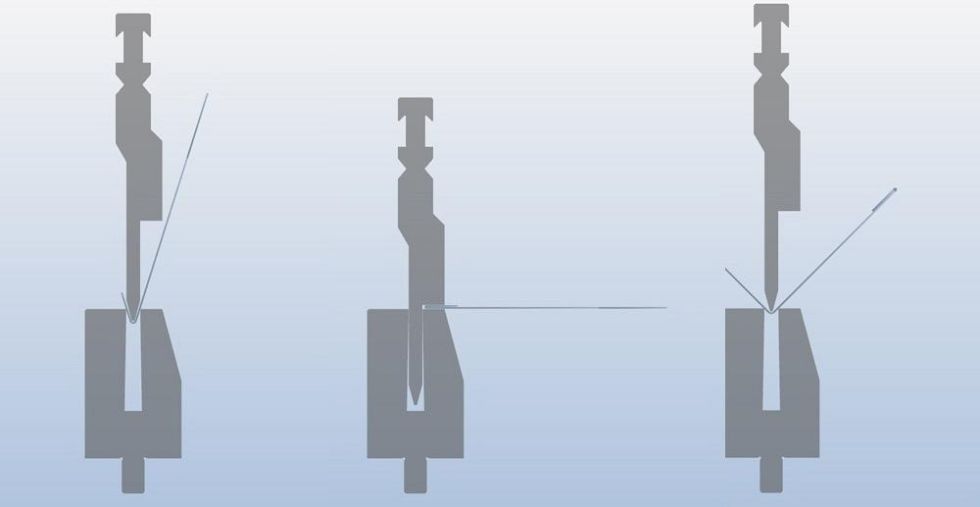
Other shapes do require specific rules for punch selection. For instance, when forming J shapes, the rules are (see Figure 6):
- When the small up-leg is longer than the bottom leg, you need a gooseneck punch.
- When the small up-leg is shorter than the bottom leg, any punch shape will work.
- When the small up-leg is equal to the bottom leg, you need an offset acute punch.
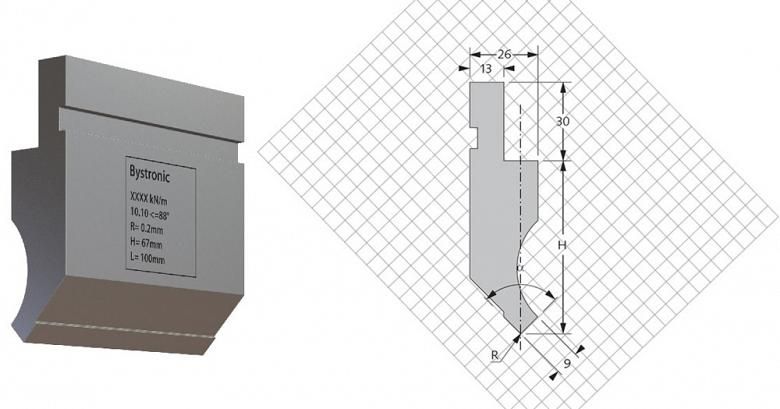
As you can see, the punch selection rules deal mostly with workpiece interference, and this is where bending simulation software can play an important role. If you don’t have access to bend simulation software, you can use your tooling supplier’s drawings with grid backgrounds to check for punch-part interference manually (see Figure 7).
Offset Rules
If you’re using a conventional toolset, you’ll need to use two ram cycles to form offsets or Z shapes. For these shapes, the rules are (see Figure 8):
- The center leg (web) must be larger than half the V-die body width; note that this is the entire die body width, not the V-die opening.
- The side leg must be shorter than the V-die height plus the riser height.
- When the center leg (web) is less than half the width of the V-die body, you’ll need a special tool that forms both bends in one ram stroke. The upside with these form tools is you do not need to flip the plate over. The downside is they require about three times the standard air bending force.
Rules for Bending Across Cutouts and Miters
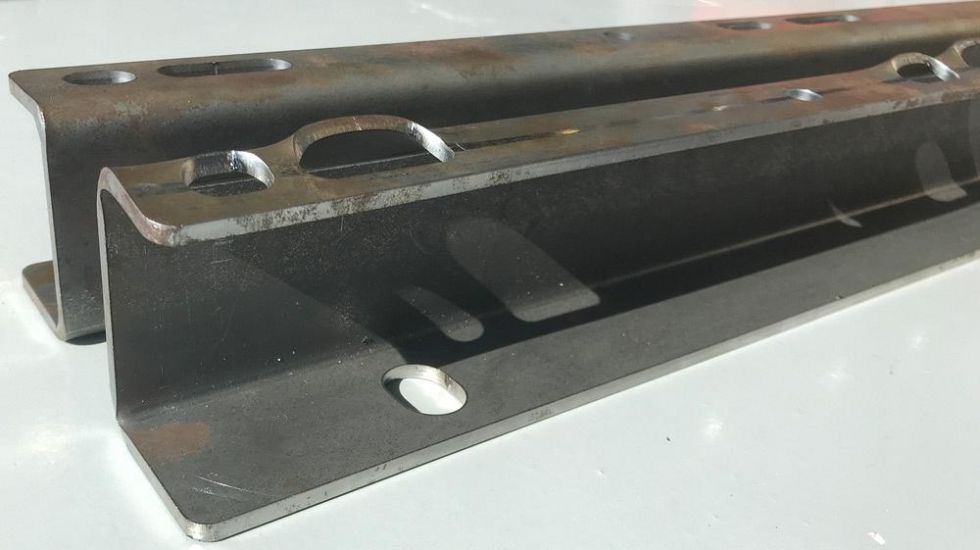
Any unsupported material inside the V die is subject to deformation; in holes and other cutouts, this deformation manifests itself as blowouts (see Figure 9). When the holes near the bend lines are small, the associated blowout will be small too. Also, most applications will accept some distortion, so there is no definitive rule on the best V-die width to choose when a cutout is on or near a bend line.
When the flanges, cutouts, and miters are clearly too close to the bend line for the metal thickness, you can specify rocker-type dies. The rockers rotate and support the material throughout the entire bending process and, thus, eliminate the blowout.
Figure 9 shows identical parts with cutouts close to the bend lines; the foreground one—with the telltale blowout—was formed using a conventional V die; the background one was formed with a rocker-type die. Also note that the two ovals on the left have the same width (front to back) and are the same distance from the bend line; only their lengths are different. You can clearly see more blowout on the longer oval.
Punch Height for a Given Box Depth
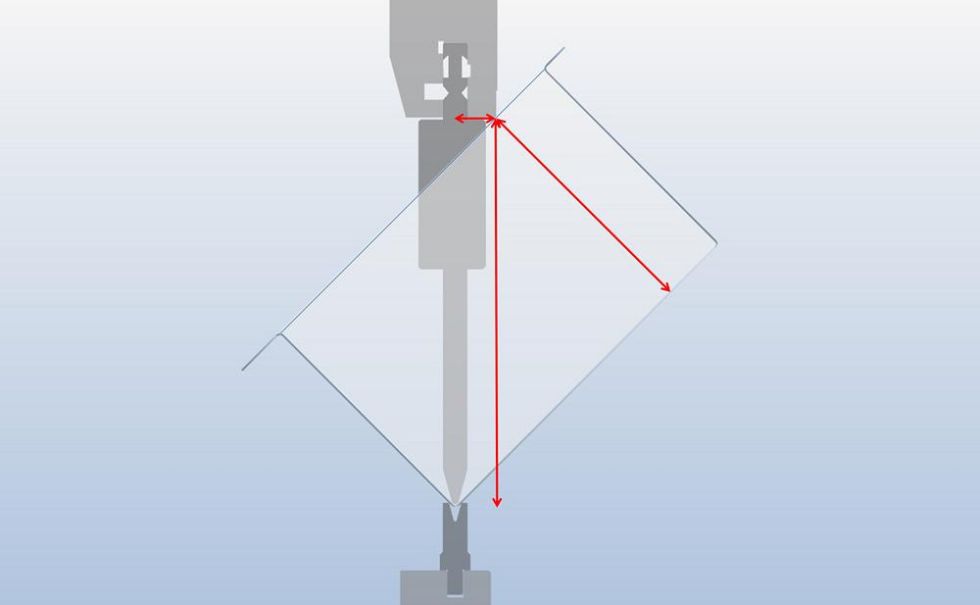
Punch height becomes critical when forming three- and four-sided boxes. In some cases, short punches can form three-sided boxes if one formed side can hang off the side of the press brake during the final (third) bend. If you’re forming four-sided boxes, you need to choose a punch tall enough to span the box height diagonally (see Figure 10):
Minimum punch height for box bending = (Box depth/0.7) + (Ram thickness/2)
If there are no top (return) flanges, or the top flanges protrude outward, you won’t need much clearance between the top punch and lower die to remove the part after bending. But if you do have return flanges (top flanges that protrude inward) on all four sides, you need enough clearance to twist and remove the box after bending.
Combination Bend and Hem
Bend-hem tools can form parts with hemmed edges in a single setup, as shown in Figure 11. Just know that if you need to hem thicknesses greater than 0.125 in., you might need custom tools to accommodate the excessive forces required.
V-die opening selection rules here are basically the same as for standard bending tools. The 30-degree prebends for the hems do require somewhat longer minimum flanges—at 115 percent of the selected V-die opening—because of the acute angles. For instance, if you’re forming material over a 0.375-in. V die, you’d need the flange to be at least 0.431 in. (0.375 × 1.15).
Scratch-free Parts
Almost all typical V-die bending tools leave some marks on the part, simply because the metal is being drawn into the die while bending. In most cases the marking is minimal and acceptable, and increasing the shoulder radius can reduce the markings.
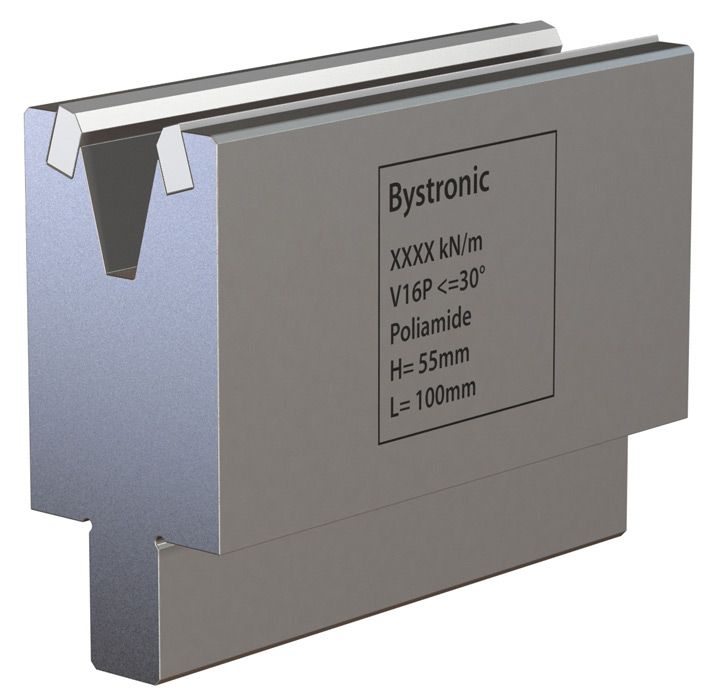
For applications where even minimal marking is not acceptable, like when bending prepainted or polished materials, you can use nylon inserts to eliminate scratching (see Figure 12). Scratch-free bending is especially important for fabricating critical aircraft/aerospace parts, because it’s hard for inspectors to visually inspect a piece and tell the difference between a scratch and a crack.
Simplicity Is a Virtue
Today’s precision tooling and press brakes can reach unprecedented levels of accuracy. And with the right tools and consistent material, a press brake operation can bend a flange to a specific angle with a specific inside bend radius. But again, air bending forms the inside bend radius to a percentage of the die opening—and having the right tools matters. Specifying a multitude of different, tightly toleranced radii will increase tooling costs. And the more tools you need, the more changeovers you’ll have, which increases costs even more.
That said, sheet metal part designers can make tooling selection and the overall bending operation much easier if they follow a few basic rules when designing parts:
- The inside bend radius should be 1.5 times the metal thickness.
- The flange length should be at least six times the metal thickness. This applies to holes in the part too; that is, holes should be located away from the bend line at a distance that’s at least six times the material thickness.
- The offset (Z shape) web dimension should be at least 10 times the metal thickness.
Exceptions to these rules abound, and each comes with complications. You can use a narrower V-die opening to bend a tighter radius or a shorter flange—but bend too sharp a radius and you risk creasing the bend line and exceeding the tonnage rating for the tooling and press brake. You can bend a narrower offset, but again, that requires a special tool and significant forming tonnage.
If a part doesn’t need a short flange, a narrow offset, or a tight radius, why complicate matters? Follow these three simple rules and you’ll improve angular performance, shorten setup time, and reduce tool cost.
